Nighthawk AXE7300 Setup
On this page, you’ll find detailed information on the Nighthawk AXE7300 router. This is a tri-band WiFi 6E router by Netgear. The model number of the router is RAXE290. You will learn about its installation, firmware update and other WiFi settings. Move on to the next section about the Netgear Nighthawk AXE7300 setup.
How to Set Up Nighthawk AXE7300 Router?
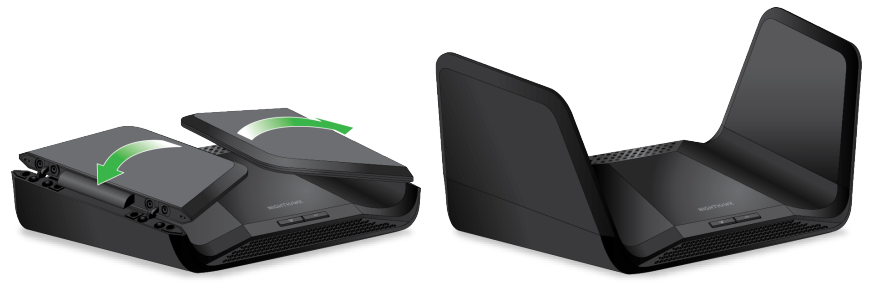
If it is a brand-new router, then unbox it and position its antennas first. Simply extend the antennas as shown here:
If you have an old router that you are going to configure then you should first reset it.
Reset Nighthawk AXE7300 Router
- Press the Reset button at the back of the router.
- Hold it for about 10 seconds.
- Release it and wait.
When the router reboots, it is ready to be set up.
Netgear AXE7300 Router Setup Steps:
- Bring the router close to the internet modem and join them with the help of an Ethernet cable. Insert the cable into the Ethernet port on the modem and the yellow Internet port on the router.
- In case of the absence of a modem, connect the main internet Ethernet cable directly to the router’s Internet port.
- Now, insert the power adapter that came in the package to the router. Plug in its other end to the electrical outlet.
- Press the Power On/Off button to supply power. The Power LED should turn solid white which is an indication that it is ready to be set up.
- Now, connect your computer to the router’s network. You can go for a WiFi connection or a wired connection.
- To connect to its WiFi, use the WiFi credentials mentioned on its label. For a wired connection, make use of an Ethernet cable.
- Now you need to configure your Nighthawk AXE7300 Router either by using the Nighthawk app on a smartphone or web-based interface on a computer.
NOTE: If using the Nighthawk app, you need to connect your phone to the router’s WiFi.
Using Web Interface
- Open an internet browser on the computer connected to the router’s network.
- In the address field, type http://www.routerlogin.net and press enter. The default IP address of the router 192.168.1.1 can also be put to use.
- You will land on the Netgear Installation Assistant.
- If prompted, use the default WiFi router login admin password to log in. Get the password on its label.
- Create an admin password for the router. Answer two security questions to help you recover lost password in the future.
- Assign the WiFi network name and password for the router. These details will be used by you to connect to its network.
- Follow other on-screen prompts and carry out the Nighthawk AXE7300 setup.
Using Nighthawk App
- Install the Netgear Nighthawk app first.
- Launch the app once it is installed.
- Use the Netgear password to log in to the app. You can create a Netgear account now if you do not have it.
- Execute the instructions that you see on the screen to complete the router setup.
Nighthawk AXE7300 Router Firmware Update
During the setup process, the Netgear Installation Assistant suggests you to update the firmware. In case you skipped it then update the router now. Besides, check for available firmware updates on a regular basis.
This is to bring to your notice that firmware updates are essential for the optimum performance of the router. Here’s how you can update your Netgear Nighthawk AXE7300 Router:
- After connecting your computer to the router’s network., load a browser.
- Visit routerlogin.net on it.
- Use the admin password to log in.
- Select Advanced > Administration > Router Update. The Router Update page will come to display.
- Click on the Check button. It will now find for firmware updates available for your router. If an update is available, a message will be displayed asking if you wish to install the updates.
- Click Yes to confirm. The router will download and install the latest firmware updates.
- Make sure that you are not interrupting the process. The router reboots once the update is completed.
You can also opt for a manual router firmware update. In this, the firmware is downloaded and saved on a PC and then installed manually on the router.